
Illustrations for ChatterModel
To all the illustrators and the clients who want to create a ChatterModel
This is the explanation of what to keep in mind when preparing illustrations for Live2D and where to divide all the parts.
For all the explanation and commission for ChatterModel please take a look at the ChatterModel Commission page .
Chatter Model is a new branch modeling currently still under development.
There is no example for this on Live2D Official and there are a lot of differences compared to a normal Vtuber Model separated parts.
It would be quite a problem if the instructions for the illustrator are not clear, that is the reason I summarized everything you need to know on this page.
If you still have some model when you think “What should I do in this case?”, feel free to send me the question with the form below. I will add it to the guide in the future if needed.
Questions about the Type of Model should be for the client.
Commission for A and B Type
Points to note and requests for Live2D illustrations.
Separating parts to prepare for ChatterModel.
Commission for C Type
Points to check when you want to produce the model from one single drawing.
For everyone
Points to note and requests for Live2D illustrations.
*Only of Suzuta is the Live2D artist for the project
Poses and compositions
-
We recommend preparing some poses and expressions for the model.
It is 100% possible to make the model If you prepare all the parts like a normal Vtuber Model with bilateral symmetry, standing straight, with straight face, etc… But the movements will be very jumpy.
For Chatter Model, please search for “PNGTuber” to see some examples first, and then contact us.
-
We can manage the overhead or view from a lower angle to an extent.
-
We accept the motion for small objects.
Motion for book, keyboard, controller, eating or drinking etc…
-
Some simple animation for background is also possible
I am thinking about cushion or musical notes effect.
-
For special motion or gimmick, please talk to us while we are still doing rough sketches and planning.
Separating parts
-
In general, it’s fine as long as you do as the commission asked for/to the best of your ability.
-
Suzuta (or maybe the assistant) can prepare the parts if you can pay the fee, but then we will have to draw or cut some parts. If that is the case, some color tone and the order of the layer may change somewhat, but we will try our best to maintain the original design as much as possible.
-
If you have a preference on how the movements should look like, it would be great if you can draw some examples to show us.
-
If you think some parts need to be separated, even if it’s not included in the guide, please feel free to prepare the part.
-
You can name the layers as you like, but please make sure that there are no layers with the same name.
For example. “Upper right eyelash”, “Right pupil”, “Right Highlight” can be like “Right eye 1”, “Right eye 2”, “Right eye 3”.
Instead of having them as “Copy of” some layers, just adding a number can make it much shorter and easier to read.
About the files
-
Please use “RGB” and “8bit” for Color mode. “sRGB” for Color Profile. When I import the files to Live2D the color tone can change slightly. For more details on the settings, please take a look at the link below.
Notes on PSD Creation | Editor Manual | Live2D Manuals
-
You can use the Mutiply/Add function. You can use Add (Glow) on ClipStudio. The other layer effects can not be used so just combine them when exporting the file.
-
If possible please use up to 4 group layers when you are drawing.
-
Even if there are some parts sticking out of the line in the drawing, that is fine as long as you tell us that you want that part to be fixed. (Of course you can fix the part yourself with clipping function)
-
If you use ClipStudio, it would be greatly appreciated if you can send us the .clip file. (Because the opacity can change etc…)
-
When you use the mutiply/add effect or when you change the opacity of the layer, the value may reset when importing to Live2D, so please write all memos like “Opacity 80%” “Mutiply” on a layer for all the memo, or just add the memo to the name of the layer.
Separating parts to prepare for Chatter Model.
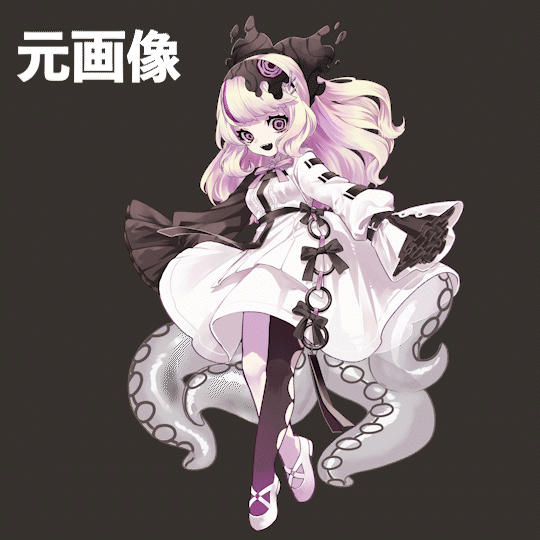
Using the Model i made with Yokubariyachiii-san as an example, I will explain all the parts I would like you to work on.
The only difference between A Type and B Type is the separated parts of the eyes, so please separate all the details for the A Type, and all the toggles for the B Type. (B will require more work in my opinion)
Separating parts for the eyes
A Type
A Type’s eyes can blink and move smoothly like a Vtuber Model.
-
Please separate the eyes layers into super detailed layers like Eyelashes, pupil, highlight, etc…
-
If there are toggles to change expressions please give us a guide on how to handle it.
-
The guide can be a guide in general, or just drawing with lines and giving direction through rough sketches are fine.
-
If not too much trouble then I would like to have another guide to how to move the eyes (the direction, where you want the pupil to move).
B Type
B type makes facial expressions by switching images.
-
The pupil movements, eyes closing, and toggles for the facial expressions, anything you expect to move you will need to prepare.
-
If the makeup or the shadow gets in the way of the order of the layers of hair or skin, you need to separate that as well.
-
Since we are not do the blinking motion with smoothness like the other one, we can use some special eyes for the closed eyes (for example ><)


Separating parts for the mouth and face
Separating parts for the mouth - A Type
A type can open and close the mouth seamlessly with the sound recognition, but since the parts are quite hard, the modeler will separate this.
-
Please prepare drawing for open mouth and closed mouth. The modeler will make the shape of the mouth change to match the vowel, so it would be easier if we do not show teeth here.
(If you absolutely need the teeth like the jagged teeth feel free to draw it) -
If you want toggles for facial expressions then please prepare the mouth for that as well. (If the open mouth changes then you will need to prepare for it)
Separating parts for the mouth - B Type
B type makes facial expressions by switching images.
-
Please prepare the closed mouth, mouth when saying “A”, “I”, “U”, and “E”
-
If you want toggles for facial expressions then please prepare the mouth for that as well. (If the open mouth changes then you will need to prepare for it)
Separating parts for the face
-
Separate the eyebrows left and right, you need to prepare them separately if we have any facial toggle.
-
No need to separate the skin parts, like the nose or cheek color.
-
For the hair, you need to separate the bangs, sides, and back. Hair ornaments or big tufts of hair are not necessary.
-
If the shadow clips the skin then you need to separate that layer as well.


Separating body parts
-
In general, you can leave the trunk(torso) in 1 part. (Please separate the following parts if you want them: Tail, wings, big chest etc…)
-
Please separate the arm or anything attached to the main body.
-
Fingers and small objects that are expected to be animated will need to be separated as well.


Points to check when you want to produce the model from one single drawing.
When you want to produce the model from one single drawing, you absolutely need the permission from the original artist. The following are some references and points for you to note.
If we can get the permission then we will treat the artwork carefully, and will try our best to bring out the charm of the art with nice movements.
The Examples
This is the Chatter Model I made by using a single illustration by Nerimon-san.
Things you need to know when separating the parts
-
You want to break all the parts in the face area into detail.
-
There are cases that the 50% transparent part can become 0 transparent.
-
The very detailed line of the expression or the re-color can change slightly.
-
If you use the color profile different from what i recommend then the color tone of the product may change.


Points to check as an Illustrators
-
Currently we are asking all the clients to get permission from the original artist before contacting us. But even with permission, we can still decline the work due to various reasons like delivery date, pricing, etc…
-
Unless there is a specific request from the illustrator, Suzuta will publish the artist name on the twitter post with the finished product.
-
If you have any special conditions to give the client permission, like you want to check the final product first before publishing, then please talk to the client.
-
To avoid any legal problems, all the communication will be through the client (except for our partnered artists)